Documentation
Get started with Arrival
Everything you need to set up Arrival, understand its features, and troubleshoot common issues.
Installation #
Download the latest .dmg,
open the disk image, drag Arrival into your Applications folder, and launch it.
Once launched, look for the Arrival icon in your menu bar — a small route icon near the clock. If you don't see it, check System Settings → Control Center and make sure menu bar apps are visible.
Setting Up Routes #
Before Arrival can show traffic data, configure at least one route. Click the Arrival menu bar icon and open Settings.
Enter your addresses
Open the Routes pane and fill in Home and Work. Arrival resolves them through Apple Maps — full street addresses work best. There is one commute, not a list: Arrival works out the direction from your schedule, so you never pick a route by hand.
If your ETA looks off by a few minutes no matter how you tune it, use Use Where I Am instead. Stand at the address, click it, and Arrival pins your exact coordinates rather than geocoding the text. A typed address can resolve to a city centroid a couple of kilometres from your actual desk, and nothing else will fix a wrong starting point.
Configure your commute schedule
Set the days and times you commute. Arrival uses your schedule to show the right direction — heading out in the morning, heading home in the evening — so the menu bar always shows the trip that matters right now.
Pick which days you actually drive. If you work from home on Wednesdays, clear that day and Arrival stops switching direction and stops showing the notch HUD on Wednesdays.
Using Arrival #
Arrival checks traffic in the background and puts everything you need in the menu bar and dropdown panel.
Menu bar icon
Shows your current travel time (e.g. 22 min) with a shape icon — circle for clear, triangle for moderate, double exclamation for heavy.
Direction detection
Picks the right direction based on your commute schedule — no need to flip between "to work" and "back home."
Multiple routes
The menu bar shows the fastest way right now. The dropdown lists the alternates your provider returned, each with its own time, so you can see what taking a different road would cost.
Incidents
Accidents, construction and closures appear below your travel time, and as pins on the map. Mapbox only — Apple Maps does not report incidents, so this stays empty until you add a key.
Traffic moods
Notch HUD #
Arrival can live in your Mac's notch instead of the menu bar, growing from a quiet bar to the whole popover as you ask for more.
Turning it on
It's off by default
Open Settings → General and turn on Show in the notch. No notch on your Mac? You get the same HUD as a pill at the top of the screen — the feature works either way.
The three states
The HUD grows as you engage with it, and shrinks back on its own:
- Glance — a thin bar hugging the notch with your drive time and arrival time. This is the resting state
- Hover — the pill drops down with the mood, how many minutes you're losing, and when you'll actually get there
- Click — the whole popover, with every route and the map, hanging from the notch
When it appears
The HUD is deliberately quiet. It shows up only when all of these are true:
- You're inside a commute window from your schedule
- It's a day you marked as one you drive
- You haven't already arrived at the place you're driving to
That last one means the HUD takes itself away once you park at work, rather than insisting you still have 22 minutes to go. It comes back on its own for the trip home. This needs Location access — without it Arrival can't tell that you've arrived, and the HUD stays up for the whole window.
Note
When the numbers go stale
If Arrival can't reach the traffic provider, the HUD says so: the dot greys out and the hover pill reads Not updating. What's on screen is the last reading it got, not a current one.
While the HUD is up
The menu-bar item collapses to a mood glyph, so your drive time isn't shown twice. Everything you can do from the popover you can do from the expanded HUD, including opening the map and reaching Settings.
Widgets #
Three desktop widgets — small, medium and large — showing your commute as the window runs. There's nothing to configure.
Adding one
From the widget gallery
Right-click your desktop and choose Edit Widgets, then pick Arrival. Drag the size you want onto the desktop. Clicking a widget opens Arrival's map window.
What each size shows
- Small — which way you're heading, the drive time, and how it compares to your usual
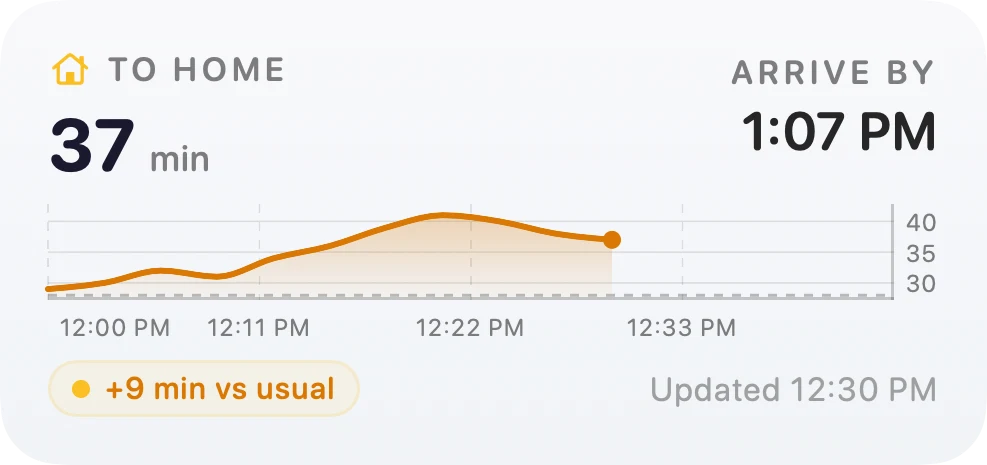
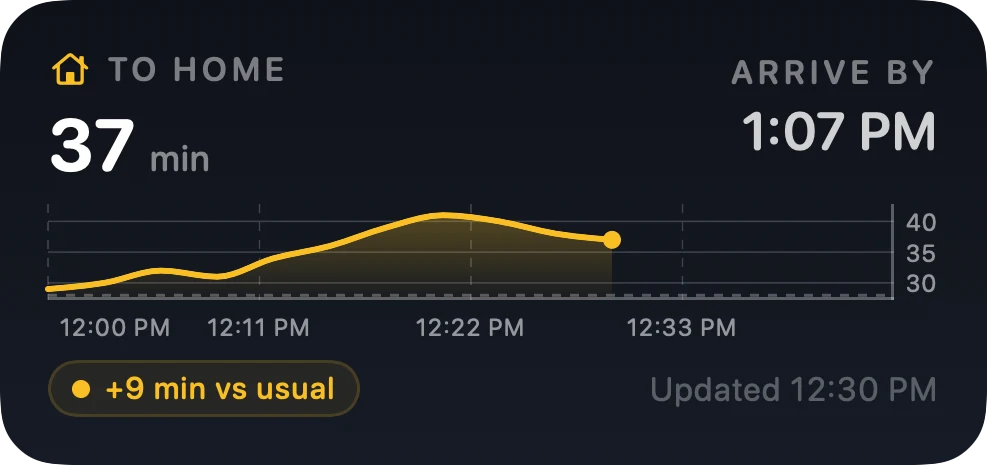
- Medium — the same, plus when you'll arrive and a chart of the window so far
- Large — the chart at full height, your alternate routes, and any incidents on the way
The chart
It starts at the first reading of the current window, not at the hour your schedule opens. A drive that begins at 3pm charts from 3pm, rather than squeezing twenty minutes of data into an eight-hour frame. The dashed line is your baseline — the drive with no traffic — so the gap between the line and the dash is what today is costing you.
Gaps are drawn as gaps. If your Mac sleeps or a few checks fail, the line breaks and the missing stretch is shaded, rather than a straight line implying a trend that never happened.
Between windows
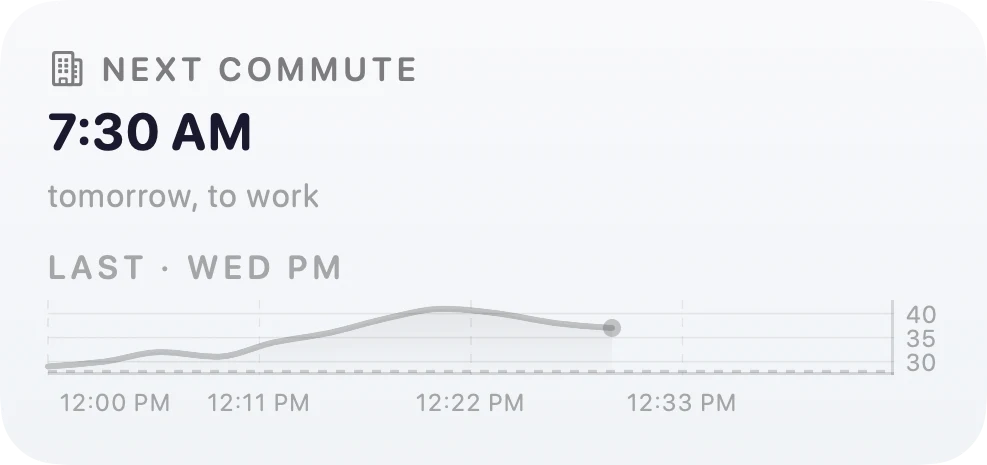
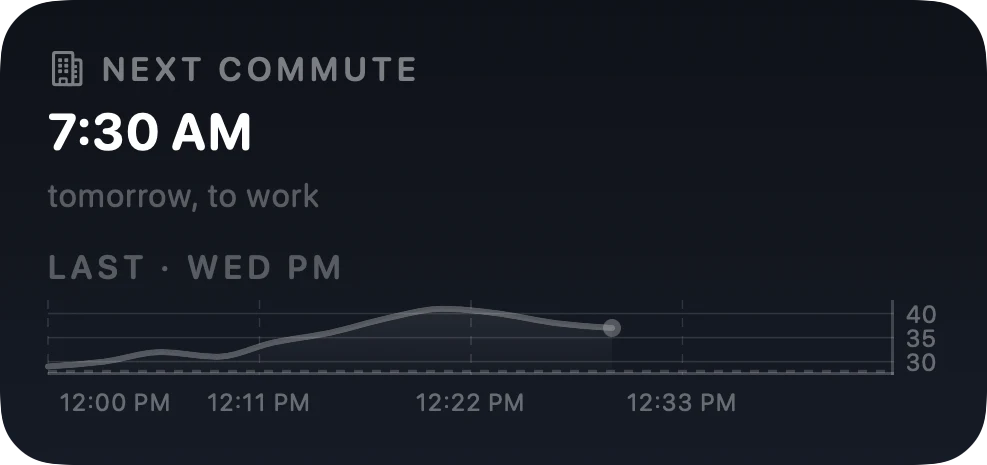
Outside your commute window the card leads with when your next commute starts and which way it goes. Your last commute stays below that under its own Last · Wed PM heading, so an old number can't be mistaken for a current one.
Note
Widgets follow the app
The widgets draw what Arrival last wrote for them, so they need Arrival running to stay current. When it isn't, the card dims and keeps saying when it last heard something. If a window opens before the first check of it lands, you get the empty chart and the window it's waiting on.
What they don't do
The widgets make no network requests of their own and read no settings. Everything they draw is written by the app into a shared file on your Mac, which is also why they cost no extra API calls. See Privacy.
Map Window #
The map fills its own window, with one panel floating over it: the drive, how far off your usual it is, your ETA, your alternates and when it last checked. Three ways in — the expand button on the map in the dropdown, a click on any widget, or the Dock icon if you turned that on. It behaves like an ordinary window, so it can sit behind others.
Congestion overlay
Your route is drawn green where things are moving and red where it is backed up. Mapbox only, since Apple Maps returns no per-segment congestion; on Apple Maps the line is one colour.
Route sync
The map stays in sync with whichever route is selected. Switch routes and the map updates automatically.
Arrival uses Apple Maps by default — no setup needed. Mapbox is an optional upgrade that adds congestion overlays and traffic incidents. The free tier (100k requests/month) is more than enough for personal use. Add your key in Settings.
Settings #
Open Settings from the Arrival menu bar icon, or press ⌘, with any
Arrival window focused. Five panes down the left: General, Routes,
Schedule, Traffic and Privacy. Everything is stored locally on your Mac.
Default Polling interval
How often Arrival checks for new traffic data. Shorter intervals are more current but use more network. Two sliders in Schedule: During a commute defaults to 3 minutes, and The rest of the day to 15.
Start at login
In General. Turn it on and Arrival starts up when you log in to your Mac. Uses macOS Login Items — starts silently in the background.
Show icon in Dock
In General → Where Arrival appears, off by default, since Arrival lives in the menu bar. Turn it on and clicking the Dock icon opens the Traffic Map.
Open routes in
In Routes. When you open directions, Arrival hands off to either Apple Maps or Google Maps.
Maps provider
Apple Maps
- The default — no API key needed
- Live travel times and route paths
- Traffic moods (green/amber/red)
Mapbox
- Color-coded congestion per segment
- Traffic incidents, shown in the app
- Better baseline estimates
- Free tier: 100k requests/month
Sign up at mapbox.com and paste your key in Settings → Traffic.
With a key set, Schedule shows “Estimated Mapbox use” against the 100,000 free requests, so you can see what your polling intervals cost before they cost it.
Privacy #
Arrival has no account, and getarrival.app only ever serves you this page, the app and its update feed. The one thing you can send us is a feedback report, and only when you write one and press Send. Everything below is what actually happens, in full.
What stays on your Mac
Four places, and nothing leaves the machine you set it on.
The macOS Keychain
Your home and work addresses, their coordinates, and your Mapbox token. Encrypted, and bound to Arrival’s code signature, so another program asking for them raises a password prompt.
Standard macOS preferences
Everything that is not a secret: your schedule, commute days, mood thresholds, polling intervals, theme.
The widget’s container
One file, current.json. Widgets cannot make network requests, so this is the only way they get anything to draw: the open commute window and the last finished one, as drive times, road names and timestamps. No address, no coordinate, no token. The finished window is dropped once its newest reading is a day old, so nothing accumulates.
A settings file beside it
Carries your preferences over to the Mac App Store version. It holds only the non-secret half of this list. Nothing from the Keychain is written to it, which is why the App Store build will ask for your addresses and key once, on first run.
Your location stays with you
If you grant Location access, Arrival checks whether you are near home or work, so the notch HUD can tell that you arrived. Those readings stay in memory. Nothing writes them down and nothing sends them anywhere.
“Use Where I Am” is the deliberate exception, since pinning a spot is the whole point of it. That one fix is saved — to your Mac’s keychain, alongside your typed addresses — and it goes to Apple’s geocoder once, to turn the coordinates into a street name for the field. Neither the fix nor the label ever reaches us.
Anonymous usage stats and crash reports carry no coordinate and no address. They report which screen opened, whether a fetch succeeded, and which error code came back. A scrubber also strips coordinate pairs and addresses from every report before it leaves your Mac, so a stray value in an error message cannot escape.
Your choice
Diagnostics are off until you say yes
Arrival asks on first launch, and nothing is sent before you answer. You can change the answer at any time in Settings → Privacy. Turning it off stops usage data immediately.
What does leave your Mac
Two things, both to Apple or Mapbox rather than to us.
Calculating a drive time requires a routing service, so Arrival sends the start and end coordinates of your commute to the provider you picked. On Apple Maps that request goes to Apple. On Mapbox it goes to Mapbox, under your own access token. That request is what returns your ETA.
Turning an address into coordinates also needs Apple. Press Return on an address and the text you typed goes to Apple’s geocoder; use “Use Where I Am” and the coordinates go instead, to come back as a street name. This happens when you edit an address, not on a schedule.
Two more requests leave, neither carrying anything about where you are. If you said yes to diagnostics, usage counts and crash reports both go to PostHog, scrubbed as described above; say no and neither starts. Each install carries a random identifier so repeat events group together, and it is tied to no name, no email and no account. And Arrival checks getarrival.app for a new version, which tells us an anonymous request happened and what version asked.
The last one is the only thing you send by hand. Send Feedback in the menu carries the words you typed, your app version, and — if you leave the box ticked — the same scrubbed activity log the Copy button gives you, so you can read it first. The email field is optional, and the form sends without it. This one ignores the diagnostics switch on purpose: a report you wrote and sent is not something collected in the background, so turning diagnostics off does not silently throw it away. That is the whole list.
Troubleshooting #
Common questions and fixes.
- Check that your origin and destination addresses are valid in Settings → Routes.
- Verify your Mac has an active internet connection.
- If using Mapbox, confirm your API key is entered correctly and has not expired.
A normal update never triggers this, because every release carries the same signature. You see it when you replace Arrival with a build that came from somewhere other than a release, such as one compiled from source or sent to you directly.
If your addresses look empty after you dismiss the prompt, quit Arrival, open it again, and choose Always Allow. Your saved settings are still there, and Arrival reads them once it has permission.
The report carries the words you typed, your app version, and — if you leave the box ticked — the last 15 minutes of activity, scrubbed of addresses and coordinates. It is the same log the Copy button in Settings → Privacy hands you, trimmed to fit, so you can read it first. Leaving the log in makes a bug far easier to find.
The email field is optional. Fill it in and you can get a reply; leave it blank and the report still sends, with no way to trace it back to you. This form works whether diagnostics are on or off, because a report you wrote and sent is not something collected in the background.
Updates #
Arrival uses Sparkle to handle updates. When a new version drops, you'll get a prompt inside the app.
If you prefer to update manually, download the latest .dmg from
the website,
drag the new version to Applications, and replace the old one.
Beta updates
To get builds before general release, open Settings → General and turn on Receive beta updates. Betas arrive through the same Sparkle prompt as stable releases, just earlier. Stable releases still reach you either way, so turning this on adds updates rather than replacing them. Turn it off and you simply stop seeing prereleases — you stay on whatever version you already have until the next stable one catches up.
Tip
Keep it up to date
Updates bring better traffic accuracy, new features, and fixes for the latest macOS versions. Sparkle will let you know when one's ready.